UI Design in photoshop is tricky whereas adobe xd is available and it is
easier than photoshop but photoshop has a lot of other tools to manipulate
your design and images.
So, let's start and see how can we easily create a UI design in photoshop with
these tools
Watch Video Tutorial
First, create a new custom template W 1300 x H 800 on white
background
then select the Rounded Rectangle Tools and create W 1250 x H 750
shape
set the shape color to #375a63
again select the Rounded Rectangle Tools and create a W 1200 x H 700
shape
Effects:
Gradient Overlay:
Opacity 100%
Blend Mode Normal
Style Linear
Gradient
Left point color should be #2b444e, location 0, opacity 100%
The right point, color should be #192d35 location 100, opacity 100%
Angle 90 degree
Scale 100
Inner Shadow:
Opacity 70%
Blend Mode Multiply #1c3139
Angle 120 degrees (use global light unchecked)
Noice 0
Distance 0
Chock 5
Size 20
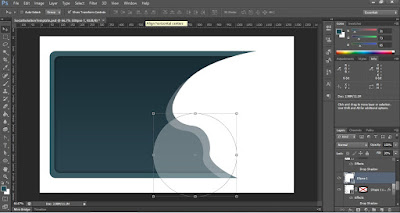
Now create a custom shape using a pen tool like showing in the below image
make the above shape duplicate and set its opacity to 30% and change its
positions a little bit outside of the top shape like showing in the below
image
Select the circle tool and create a circle W 425 x H 425 make its
opacity 30% and make sure that the circle layer after the above shapes
Now select the above three layers and put them into a group then select the rounded rectangle shape and make the selection of it by clicking twice on the
layer.
then select the shape group and click on the mask tool to make shapes
perfect in a rounded rectangle shape. see in below image
Place an illustration design or whatever you want and adjust the position
according to your design.
Select the text tool type "S" then style it.
Font MV Boli
Size 140
Color #ffc700
VA 50
Faux Bold and Small Caps
Then duplicate the "S" layer change the text like shown in the image then
just change these.
Size 60
Color #ffffff
and make a duplicate layer of it and change the text for the second layer
select the Rounded Rectangle Tools and create a shape for button W 220 x H 50
Effects:
Gradient Overlay:
Opacity 100%
Blend Mode Normal
Style Linear
Gradient
Left point color should be #375a63, location 35, opacity 100%
The right point, color should be #1f3842 location 65, opacity 100%
Angle 90 degree
Scale 100
Drop Shadow:
Opacity 50%
Blend Mode Screen #ffffff
Angle -90 degree (use global light unchecked)
Noice 0
Distance 1
Chock 0
Size 0
Make a duplicate layer of it and clear all effects then adjust the size
of the shape.
Go to filter menu blur -> gaussian blur 4.9
Set opacity 30% and fill 50%
Finally, press and hold Shift+Ctrl+Alt and press E
it will create an image to merge all layers but the original layer remains
now select this layer and change blend mode to soft light
It will look a little bit different now.


0 Comments